Table of contents
Introduction
This article is the second in a series of articles about Nuke. You can find the previous one in the list at the bottom of the article.
You can find the final code with the elements described here, and some more, on my GitHub: Ztr.AI.
Unit test coverage
It took me a really long time to run the unit test coverage check and return an error when this coverage is too small. Unfortunately, this solution is still not perfect, because it only works on a Windows machine, and it needs some code.
Examining code coverage with unit tests is done with Coverlet, which is used by the dotnet test environment.
I didn’t use DotCover because I’m not sure I can use this tool in every project, and I need something as universal as possible.
To use it, you need to install the appropriate package:
nuke :add-package coverlet.console --version 3.1.2
# or, if you have not installed the nuke tool
dotnet tool install --global coverlet.console --version 3.1.2
The biggest problem, it turned out, was forcing appropriate test coverage. Only one, of the many configurations I tested, works, that is, it returns an error when test coverage is lower than indicated, here it is:
Target TestCoverage => _ => _
    .DependsOn(Tests)
    .TriggeredBy(Tests)
    .OnlyWhenStatic(() => IsWindowsWhenReleaseOrAnyOsWhenOther()) (1)
    .Executes(() =>
    {
        var coverageTestSettings = TestSettings
            .SetConfiguration(Configuration.Debug)
            .SetProjectFile(Solution);
        DotNetTest(coverageTestSettings); (2)

        var previousCoverageFileResult = string.Empty;
        CoverletTasks.Coverlet(s => s
            .SetFormat(CoverletOutputFormat.cobertura, CoverletOutputFormat.json) (3)
            .CombineWith(TestsProjects, (settings, project) =>
                PrepareCoverageSettingsForCoveringProject(project, settings, coverageTestSettings,ref previousCoverageFileResult) (4)
            )
        );

        (7)
        ReportGeneratorTasks.ReportGenerator(s => s
            .SetTargetDirectory(TestResultDirectory / "report")
            .SetFramework("net6.0")
            .SetReports(TestResultDirectory.GlobFiles("**/*.cobertura.xml").Select(d => d.ToString())));
    });

CoverletSettings PrepareCoverageSettingsForCoveringProject(Project project, CoverletSettings settings,
    DotNetTestSettings coverageTestSettings, ref string previousCoverageFileResult)
{
    var assemblyPath = FindAssemblyForProject(project);
    var coverageResultDirectory = TestResultDirectory / project.Name;

    settings = settings
        .SetAssembly(assemblyPath)
        // The slash at the end is necessary so that coverlet knows to treat the path as a directory.
        .SetOutput(coverageResultDirectory + "/")
        .SetTargetSettings(coverageTestSettings
            // Building the tests separately is a key element for Coverlet to work properly.
            .EnableNoBuild()
            .SetProjectFile(project));

    settings = MergeCoverageResultsWithPreviousRun(previousCoverageFileResult, settings); (5)
    previousCoverageFileResult = SetThresholdForLastRun(project, coverageResultDirectory, ref settings); (6)

    return settings;
}

string SetThresholdForLastRun(Project project, AbsolutePath testResultFile, ref CoverletSettings settings)
{
    if (TestsProjects.Select(d => d.ProjectId).Last() == project.ProjectId)
        settings = settings.SetThreshold(UnitTestCoverage_Minimum);
    string previousCoverageResult = testResultFile / "coverage.json";
    return previousCoverageResult;
}

static CoverletSettings MergeCoverageResultsWithPreviousRun(string previousCoverageResult,
    CoverletSettings settings)
{
    if (!string.IsNullOrWhiteSpace(previousCoverageResult))
        settings = settings.SetMergeWith(previousCoverageResult);
    return settings;
}

AbsolutePath FindAssemblyForProject(Project project)
{
    var projectName = $"**/{Configuration.Debug}/**/" + project.Name + ".dll";
    var first = SourceDirectory.GlobFiles(projectName).First();
    return first;
}
Well, and landed an unreadable wall of code. Forgive it for being so large, but I think this will make it easier for you to copy. Let’s discuss the most important parts of the code:
| 1 | At first, let’s skip running this step on all platforms except Windows. The code for the method that checks the platform is below. |
| 2 | To be sure, we run the tests again in the Debug configuration. Testing coverage for code built in Release does not always give good results. |
| 3 | We will examine code coverage for each project with tests separately.
Therefore, we need two output formats: cobertura for generating the report and json, which, as a native format, allows us to merge the results.
The merging itself occurs in step 5. |
| 4 | Since we are examining coverage for each project separately, we need to prepare the appropriate parameters. |
| 5 | We need to remember that we only have something to merge when we first run the program. |
| 6 | Finally, after doing the last test, we can set the required level of code coverage with unit tests. If we do this beforehand, this level will be checked for each run, which in some cases may end up with an error. |
| 7 | At this point, we have already examined the code coverage with unit tests, and we can generate a report. |
Checking the operating system
When trying to check what environment the code is running on via GitHub Actions, I had a lot of confusing information.
Even the data from the EnvironmentInfo class was returning that the runtime environment was Windows, while it was the Ubuntu distribution.
The only sensible way I know of, at this point, is to call the uname command.
bool IsWindowsWhenReleaseOrAnyOsWhenOther()
{
    var isWindows = IsWindows();
    if (isWindows && Configuration == Configuration.Release) return true;
    return Configuration.Release != Configuration;
}

static bool IsWindows()
{
    try
    {
        Process p = new Process
        {
            StartInfo =
            {
                UseShellExecute = false,
                RedirectStandardOutput = true,
                FileName = "uname",
                Arguments = "-s"
            }
        };
        p.Start();
        string uname = p.StandardOutput.ReadToEnd().Trim();
        Serilog.Log.Information($"You run this built on {uname} machine.");
        // MSYS_NT - this name return uname on Github Action's machine.
        return uname.Contains("MSYS_NT", StringComparison.InvariantCultureIgnoreCase);
    }
    catch (Exception)
    {
        return true;
    }
}Unit test report
A few more words about the report. The report will help us keep track of which modules of our application are tested the most and which are tested the lowest. There are also platforms that can make more use of them and display them nicely, but for now I had no need to play with it further. If you know of any interesting uses for the report, let me know in the comments!
Note how the cubertura files are searched for to generate the report: TestResultDirectory.GlobFiles("*/.cobertura.xml").
As you can see, Nuke gives us a cool tool to operate on files and directories.
Publishing with uploading to Netlify as an example of CI/CD.
The entire CI/CD process cannot do without publishing the solution to the working server. As an example, I will show how to publish a Web Assembly (WASM) application made with Blazor technology to a Netlify server.
When publishing the project I use the library NetlifySharp, also for the following code snippet to work correctly you need to install it:
Install-Package NetlifySharp -Version 1.1.1The code looks as follows:
[Parameter] readonly string NetlifySiteId;

[Parameter][Secret] readonly string NetlifySiteAccessToken; (1)

Target Publish => _ => _
    .DependsOn(Compile)
    .Executes(() =>
    {
        var projectToPublish = Solution.GetProject("ZTR.AI.Example"); (2)
        DotNetPublish(s => s
            .SetProject(projectToPublish)
            .SetConfiguration(Configuration)
            .SetOutput(ArtifactsDirectory)); (3)
    });

Target PushToNetlify => _ => _
    .DependsOn(Publish)
    .Requires(() => NetlifySiteId, () => NetlifySiteAccessToken) (4)
    .Executes(async () =>
    {
        var netlifyClient = new NetlifyClient(NetlifySiteAccessToken);
        var rootDirectory = ArtifactsDirectory / "wwwroot";
        await netlifyClient.UpdateSiteAsync(rootDirectory, NetlifySiteId); (5)
});| 1 | First, let’s define the necessary parameters for our publication to work. In this case, we need the Netlify site ID and the API access code (which we can generate in the portal settings). More about the parameters in the box below. |
| 2 | Since many projects may be suitable for publication, if only in the form of nuget packages, in this case I am interested in this one. By simply specifying the name of such a project, it can be easily selected. |
| 3 | Here we specify to which directory we want to publish our site, so that it is easy to send it. |
| 4 | Before pushing out to Netlify, let’s make sure we know the connection parameters. Without this, we may get a set of strange errors. |
| 5 | And so prepared page we can send with two lines straight to the server! |
I skipped the issue of publishing nuget packages in this example, as these are readily available on the Internet, for example, here. I will show my approach in a future part of this article series.
Github Actions
We do all the configuration of GitHub Actions using the attribute.
Since we can have multiple occurrences of the GitHubActions attribute, it can specify different target build steps according to our needs.
Below I show a sample build configuration for each new code proposal (pull request ) and when new changes are pushed the main branch, when the site deployment is to be performed.
[GitHubActions(
    "ForPR", (1)
    GitHubActionsImage.WindowsLatest, (2)
    GitHubActionsImage.UbuntuLatest,
    OnPullRequestBranches = new[] { DevelopBranch, MasterBranch }, (3)
    PublishArtifacts = false,
    InvokedTargets = new[] { nameof(Tests) }, (4)
    CacheKeyFiles = new[] { "global.json", "source/**/*.csproj" },
    EnableGitHubToken = true)]
[GitHubActions(
    "Deploy", (1)
    GitHubActionsImage.WindowsLatest, (2)
    OnPushBranches = new[] { MasterBranch }, (3)
    PublishArtifacts = false,
    InvokedTargets = new[] { nameof(Tests), nameof(PushToNetlify) }, (4)
    CacheKeyFiles = new[] { "global.json", "source/**/*.csproj" },
    EnableGitHubToken = true,
    ImportSecrets = new [] {nameof(NetlifySiteId), nameof(NetlifySiteAccessToken) } (5)
    )]
partial class Build : NukeBuild
{
    const string MasterBranch = "master";
    const string DevelopBranch = "develop";

    [Parameter] readonly string NetlifySiteId;

    [Parameter][Secret] readonly string NetlifySiteAccessToken; (5)
}| 1 | For each action, we need to specify the name that will be displayed on GitHub. |
| 2 | We also need to specify on which environment the procedures are to be executed. |
| 3 | We can specify the rules by which each configuration will be run (see documentation for more details).
Thus, OnPullRequestBranches triggers a given configuration when a new request (PR) arrives, which will be addressed to individual branches.
On the other hand, OnPushBranches causes a given flow to be called whenever new changes are pushed out to a particular branch. |
| 4 | The most interesting element is InvokedTargets which determines which step of our build to trigger in a given case.
This is where we gain the most from code reuse: no matter how many flows we come up with, we call the exactly same code over and over again! |
| 5 | The ImportSecrets snippet is important when we want to retrieve certain variables from the GitHub Actions environment.
Note (screenshot below) that the parameter name, for example NetlifySiteId, will be replaced with NETLIFY_SITE_ID.
The parameter fields NetlifySIteId and NetlifySiteAccessToken have been added here for clarity of the example. |
The result of such attributes will be the following YAML files:
name: Deploy
on:
  push:
    branches:
      - master
jobs:
  windows-latest:
    name: windows-latest
    runs-on: windows-latest
    steps:
      - uses: actions/checkout@v1
      - name: Cache .nuke/temp, ~/.nuget/packages
        uses: actions/cache@v2
        with:
          path: |
            .nuke/temp
            ~/.nuget/packages
          key: ${{ runner.os }}-${{ hashFiles('global.json', 'source/**/*.csproj') }}
      - name: Run './build.cmd Tests PushToNetlify'
        run: ./build.cmd Tests PushToNetlify
        env:
          NetlifySiteId: ${{ secrets.NETLIFY_SITE_ID }}
          NetlifySiteAccessToken: ${{ secrets.NETLIFY_SITE_ACCESS_TOKEN }}
GITHUB_TOKEN: ${{ secrets.GITHUB_TOKEN }}name: ForPR
on:
pull_request:
branches:
- develop
- master
jobs:
windows-latest:
name: windows-latest
runs-on: windows-latest
steps:
- uses: actions/checkout@v1
- name: Cache .nuke/temp, ~/.nuget/packages
uses: actions/cache@v2
with:
path: |
.nuke/temp
~/.nuget/packages
key: ${{ runner.os }}-${{ hashFiles('global.json', 'source/**/*.csproj') }}
- name: Run './build.cmd Tests'
run: ./build.cmd Tests
env:
GITHUB_TOKEN: ${{ secrets.GITHUB_TOKEN }}
ubuntu-latest:
name: ubuntu-latest
runs-on: ubuntu-latest
steps:
- uses: actions/checkout@v1
- name: Cache .nuke/temp, ~/.nuget/packages
uses: actions/cache@v2
with:
path: |
.nuke/temp
~/.nuget/packages
key: ${{ runner.os }}-${{ hashFiles('global.json', 'source/**/*.csproj') }}
- name: Run './build.cmd Tests'
run: ./build.cmd Tests
env:
GITHUB_TOKEN: ${{ secrets.GITHUB_TOKEN }}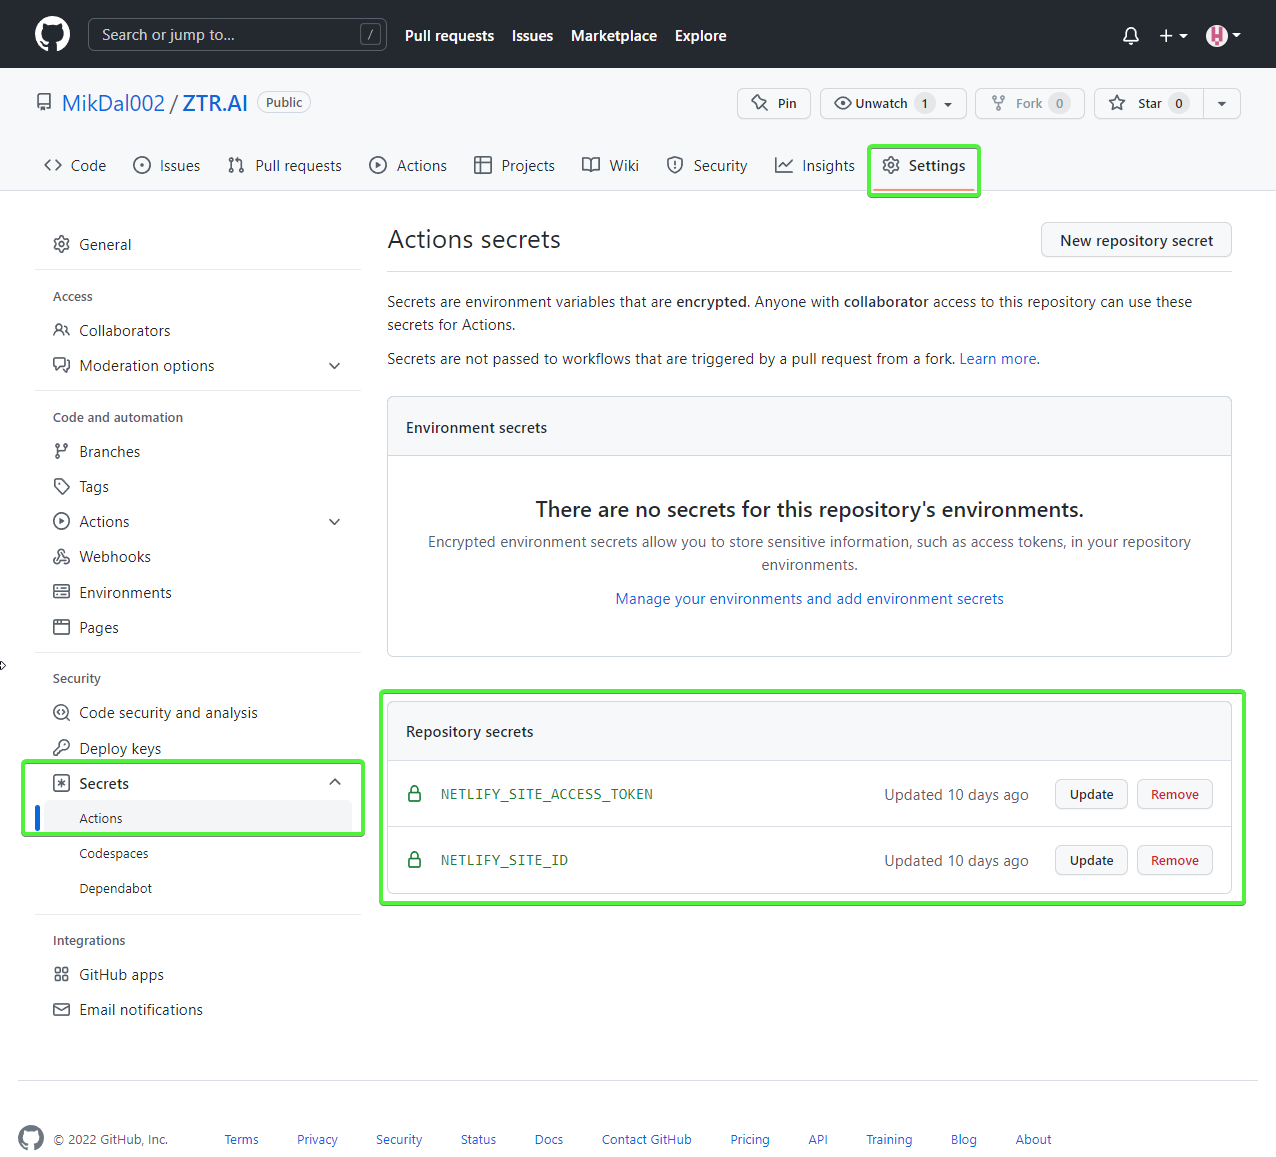
Summary
I must admit that the approach that Nuke represents appeals to me very much: I can describe the whole building process in a language I know and easily test the whole thing locally. Unfortunately, there is no rose without thorns. At this point, documentation and usage examples are scarce. Much, of what is presented in this series of articles (and what I will present) has been extracted from the codes of various repositories. At this point, the lesson learned from using Nuke is this: Nuke is a framework for calling out other tools. This has two consequences: a large number of possibilities and a large amount of searching for answers. However, it also has good points: we are not burdened by the lock put up by the library (the so-called vendor-lock), as we can easily switch to other available tools, or call specific commands directly.
You can find the final code with the elements described here, and some more, on my GitHub: Ztr.AI.
Photo by Burgess Milner on Unsplash.